Kind创建本地Kubernetes集群

本文最后更新于:2024年4月19日 早上

Minikube创建本地Kubernetes集群一文中提到过用Docker驱动创建的Kubernetes集群既不支持ingress,也不支持LoadBalancer类型的服务,所以基本上不可用,而通过Hypervisor驱动创建的Kubernetes集群也需要一些额外的配置(端口转发)才能在VPN的情况下使用。Kind是另一款在Docker容器中创建并运行本地Kubernetes集群的工具,比Minikube的Docker驱动更全面,同时也无需额外的配置就可以在VPN的情况下使用。本文将简单介绍下Kind,并在Mac主机上用Kind创建一个本地Kubernetes集群。

Kind介绍

Kind(Kubernetes In Docker)是一个使用Docker容器“节点”运行本地Kubernetes集群的工具。kind 主要是为测试Kubernetes本身而设计的,但也可以用于本地开发或CI。

集群组件配置能力

Kind提供了丰富的配置选项,有集群级别的,也有节点级别的。Kind缺省也是使用kubeadm创建和配置Kubernetes集群,通过Kubeadm Config Patches机制提供了针对Kubeadm的各种配置。详细可参考Kind配置这一节。

Kind架构

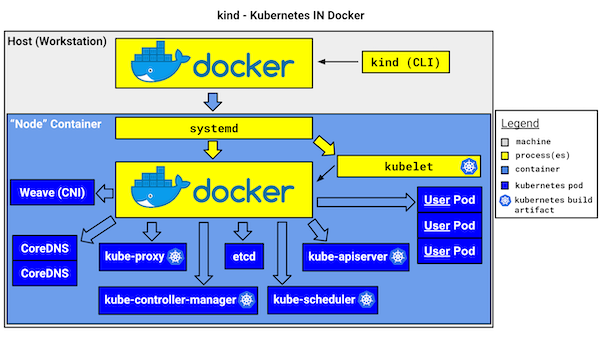
图中的节点就是一个Docker容器,所有Kubernetes集群的组件(Kube API Server,Kube Scheduler,Kube Controller Manager,Kube Proxy,CoreDNS,ETCD)以及用户Pod都以容器的方式运行在这个节点容器中。

创建Kubernetes集群

通过以下命令和配置文件创建一个包含一个主节点和三个工作节点的Kubernetes集群。

1
kind create cluster --config mykind1.yaml

mykind1.yaml:

1
2
3
4
5
6
7
8
9
10
11
12
13
14
15
16
17
18
19
20
21
22
23
24
25
26
27
28
29
30
31
32
33
34
35
36
37
38
39
40
41
42
43
44
45
46
47
48
49
50
51
52
53
54
55
56
57
kind: Cluster
apiVersion: kind.x-k8s.io/v1alpha4
name: mykind1
networking:
# the default CNI will not be installed
disableDefaultCNI: true
# WARNING: It is _strongly_ recommended that you keep this the default
# (127.0.0.1) for security reasons. However it is possible to change this.
apiServerAddress: "0.0.0.0"
# By default the API server listens on a random open port.
# You may choose a specific port but probably don't need to in most cases.
# Using a random port makes it easier to spin up multiple clusters.
apiServerPort: 6443
podSubnet: "10.244.0.0/16"
serviceSubnet: "10.96.0.0/12"
kubeProxyMode: "ipvs"
nodes:
- role: control-plane
kubeadmConfigPatches:
- |
kind: InitConfiguration
nodeRegistration:
kubeletExtraArgs:
node-labels: "ingress-ready=true"
kind: ClusterConfiguration
metadata:
name: config
apiServer:
certSANs:
- localhost
- 127.0.0.1
- kubernetes
- kubernetes.default.svc
- kubernetes.default.svc.cluster.local
- kind
- 0.0.0.0
# port forward 80 on the host to 80 on this node
extraPortMappings:
- containerPort: 80
hostPort: 80
# optional: set the bind address on the host
# 0.0.0.0 is the current default
listenAddress: "0.0.0.0"
# optional: set the protocol to one of TCP, UDP, SCTP.
# TCP is the default
protocol: TCP
- containerPort: 443
hostPort: 443
# optional: set the bind address on the host
# 0.0.0.0 is the current default
listenAddress: "0.0.0.0"
# optional: set the protocol to one of TCP, UDP, SCTP.
# TCP is the default
protocol: TCP
- role: worker
- role: worker
- role: worker

一些配置参数说明:

  • 禁用默认CNI(”kindnetd”),否则在创建出来的Kubernetes集群无法解析外网域名。

    1
    2
    3
    networking:
    # the default CNI will not be installed
    disableDefaultCNI: true
  • 为主节点添加标签”ingress-ready:true”。Kind提供的Nginx Ingress Controller的部署资源中会通过这个标签选择运行在主节点上。

    1
    2
    3
    4
    5
    6
    kubeadmConfigPatches:
    - |
    kind: InitConfiguration
    nodeRegistration:
    kubeletExtraArgs:
    node-labels: "ingress-ready=true"
  • 将容器主节点的80,443端口映射到运行Kind的主机(这里是Mac主机)的80,443端口。Kind提供的Nginx Ingress Controller的服务资源会通过NodePort将服务通过容器主节点的80,443暴露出去,这样用户就可以通过访问本地主机的80,443端口访问运行在集群中的Nginx Ingress Controller。

    1
    2
    3
    4
    5
    6
    7
    8
    9
    10
    11
    12
    13
    14
    15
    16
    17
    18
    # port forward 80 on the host to 80 on this node
    extraPortMappings:
    - containerPort: 80
    hostPort: 80
    # optional: set the bind address on the host
    # 0.0.0.0 is the current default
    listenAddress: "0.0.0.0"
    # optional: set the protocol to one of TCP, UDP, SCTP.
    # TCP is the default
    protocol: TCP
    - containerPort: 443
    hostPort: 443
    # optional: set the bind address on the host
    # 0.0.0.0 is the current default
    listenAddress: "0.0.0.0"
    # optional: set the protocol to one of TCP, UDP, SCTP.
    # TCP is the default
    protocol: TCP

    此处的hostPort指的是运行Kind的主机,也就是Mac主机。

配置Kubernetes集群

安装网络插件Calico

  • 下载Calico安装脚本

    1
    curl https://docs.projectcalico.org/manifests/calico.yaml -O
  • 设置环境变量FELIX_IGNORELOOSERPF的值为true,禁用Calico检查。

    1
    2
    3
    4
    5
    6
    7
    8
    9
    10
    11
    12
    13
    14
    15
    16
    17
    18
    19
    20
    21
    22
    23
    24
    25
    26
    27
    28
    29
    30
    31
    32
    33
    34
    35
    36
    37
    # Source: calico/templates/calico-node.yaml
    # This manifest installs the calico-node container, as well
    # as the CNI plugins and network config on
    # each master and worker node in a Kubernetes cluster.
    kind: DaemonSet
    apiVersion: apps/v1
    metadata:
    name: calico-node
    namespace: kube-system
    labels:
    k8s-app: calico-node
    spec:
    selector:
    matchLabels:
    k8s-app: calico-node
    updateStrategy:
    type: RollingUpdate
    rollingUpdate:
    maxUnavailable: 1
    template:
    metadata:
    labels:
    k8s-app: calico-node
    spec:
    ...
    initContainers:
    ....
    containers:
    # Runs calico-node container on each Kubernetes node. This
    # container programs network policy and routes on each
    # host.
    - name: calico-node
    image: docker.io/calico/node:v3.20.1
    env:
    # Disable the Calico RPF check
    - name: FELIX_IGNORELOOSERPF
    value: "true"

详细参考Calico官方安装文档,以及博客文章Creating a Kind Cluster With Calico Networking

安装Ingress Controller

1
kubectl apply -f https://raw.githubusercontent.com/kubernetes/ingress-nginx/main/deploy/static/provider/kind/deploy.yaml

安装METALLB

MetalLB是裸机Kubernetes集群的负载均衡实现,使用标准路由协议。

1
2
3
4
5
export version=v0.12.1
kubectl apply -f https://raw.githubusercontent.com/metallb/metallb/${version}/manifests/namespace.yaml
kubectl create secret generic -n metallb-system memberlist --from-literal=secretkey="$(openssl rand -base64 128)"
kubectl apply -f https://raw.githubusercontent.com/metallb/metallb/${version}/manifests/metallb.yaml
kubectl apply -f metallb-configmap.yaml

metallb-configmap.yaml:

1
2
3
4
5
6
7
8
9
10
11
12
apiVersion: v1
kind: ConfigMap
metadata:
namespace: metallb-system
name: config
data:
config: |
address-pools:
- name: default
protocol: layer2
addresses:
- 172.18.255.150-172.18.255.250

从节点网段中选取一个IP地址范围设置在metallb-configmap.yaml中用来给LoadBalancer类型服务的IP地址。

可以通过以下下命令获取node网段:

1
2
3
$ docker network inspect -f '{{.IPAM.Config}}' kind

[{172.18.0.0/16 172.18.0.1 map[]} {fc00:f853:ccd:e793::/64 fc00:f853:ccd:e793::1 map[]}]

Kind vs Minikube

  • Kind没有提供类似于Minikube的插件机制,方便用户快速地部署Kubernetes。

  • Kind并没有提供暂停一个集群的功能。

  • 和Minikube相比,Kind比较轻量,就是使用Docker容器创建并运行Kubernetes集群,但比Minikube的Docker驱动更全面。个人认为如果能够把Kind集成到Minikube中作为Docker驱动的实现,应该能更有助于两个项目的发展,用户也不需要学习两个工具了。

结束语

本文旨在简单介绍Kind,它的架构以及使用,希望能够帮助读者对Kind有个框架性的了解,从而决定是否需要深入使用。对于Kind更详细的用法,可以参考官方文档


Kind创建本地Kubernetes集群
https://www.mikesay.com/2021/10/10/create-kubernetes-kind/
作者
Mike
发布于
2021年10月10日
更新于
2024年4月19日
许可协议