命令方式设置Windows Server网络代理

本文最后更新于:2024年4月19日 早上

在公司里的服务器往往需要配置网络代理才能访问外网,不同的操作系统设置代理的方式也不同,同一个操作系统在图形化和非图形化下的设置方式也不同。本文将详细介绍如何用命令的方式来设置Windows Server的网络代理,这种方式非常适合于非图形化的Windows Server Core的网络代理的设置,对图形化的Windows Server也同样适用。

Windows Server网络代理说明

在图形化的Windows Server中设置网络代理相对来说比较简单,通常在IE浏览器的”Internet Options”里面设置即可:

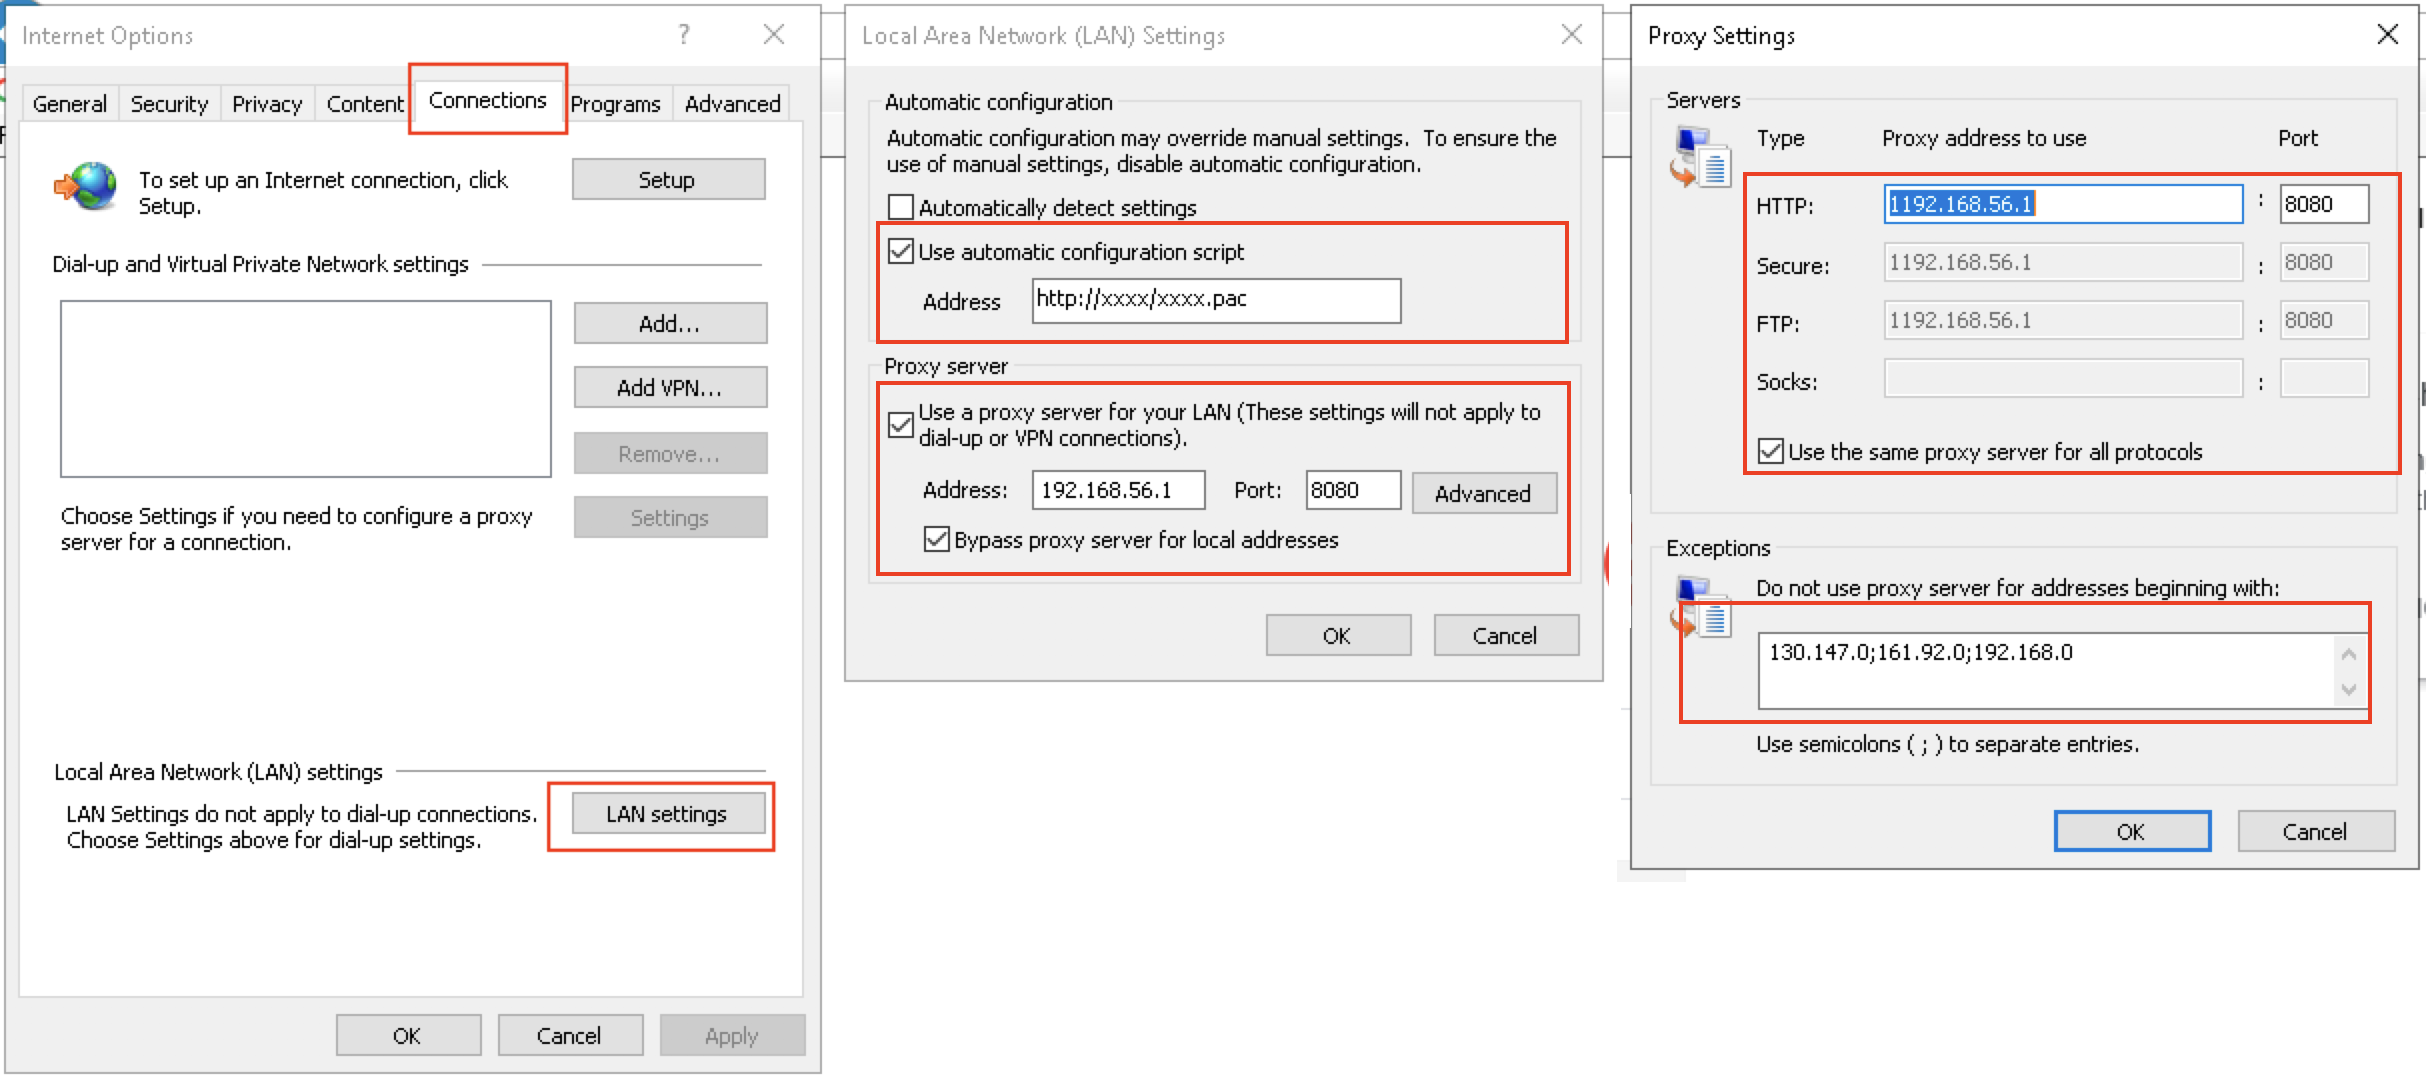
但是这个网络代理只对一部分应用起作用,比如IE浏览器等。仍旧有些应用不是使用这个网络代理。在Windows Server环境中,有以下四类网络使用方式:

  • 使用WinINET库
    WinINTE是IE浏览器的核心,同时也能被别的应用程序使用。使用WinINET的应用同样会使用IE浏览器的网络代理设置。

  • 使用WinHTTP库
    WinHTTP主要是被Windows中非交互式的应用所使用,比如需要访问网络的Windows服务或后台任务等。WinHTTP缺省不使用WinINET的网络代理设置。

  • Linux风格的网络代理
    许多Linux用户在使用Windows时仍然希望使用Linux相关的命令,他们往往通过安装Cygwin,或者GunWin32来引入Linux命令,而涉及到网络操作的命令则是通过Linux风格的网络代理来访问网络。Linux系统一般是以非图形化的方式作为服务器,所以其网络代理设置通常只需要设置环境变量:https_proxy, http_proxy和no_proxy,而桌面版的Linux是带有图形化的,其网络设置除了三个环境变量外,还需要其它地方的设置,否则那些图形化的应用将无法访问网络。本文将只介绍非图形化的Linux网络代理设置。

  • 应用级别的网络代理设置
    有些应用本身支持设置自己的网络代理,而不依赖于系统设置的代理。这些应用本身会实现很多底层的操作,比如直接使用Winsock建立网络连接。

接下来将详细介绍WinINET,WinHTTP和Linux风格的网络代理设置。

设置WinINET类型的网络代理

设置自动代理脚本

1
2
3
4
5
6
$proxyScript = "http://<your url>/proxy.pac"
$regs = "HKLM:\Software\Microsoft\Windows\CurrentVersion\Internet Settings","HKLM:\Software\WOW6432Node\Microsoft\Windows\CurrentVersion\Internet Settings"
foreach ($reg in $regs){
Set-ItemProperty -Path $reg -Name AutoConfigURL -Value $proxyScript
Set-ItemProperty -Path $reg -Name ProxyEnable -Value 0
}

设置手动代理

参考:
https://config9.com/windows/powershell/using-powershell-to-programmatically-configure-internet-explorer-proxy-settings-to-work-before-it-has-been-opened/

系统级别的设置

1
2
3
4
5
6
7
8
9
10
11
12
13
14
15
16
17
18
19
20
21
22
23
24
25
26
27
28
29
30
31
32
33
34
35
36
37
$proxy="http=<server>:<port>;https=<server>:<port>;ftp=<server>:<port>"
$bypassList="<local>;*.xxxx.com;xxxx.com;192.168.56.*;10.0.0.*"

$proxyString = ""
for ($i = 0;$i -lt (([System.Text.Encoding]::Unicode.GetBytes($proxy)).length); $i++) {
if ($i % 2 -eq 0) {
$byte = (([System.Text.Encoding]::Unicode.GetBytes($proxy))[$i])
$convertedByte=%{[System.Convert]::ToString($byte,16)}
$proxyString = $proxystring + $convertedByte + ","
}
}
$bypassString = ""
for ($i = 0;$i -lt (([System.Text.Encoding]::Unicode.GetBytes($bypassList)).length); $i++) {
if ($i % 2 -eq 0) {
$byte = (([System.Text.Encoding]::Unicode.GetBytes($bypassList))[$i])
$convertedByte=%{[System.Convert]::ToString($byte,16)}
$bypassString = $bypassString + $convertedByte + ","
}
}
$regString="46,00,00,00,00,00,00,00,0b,00,00,00,"+(%{[System.Convert]::ToString($proxy.length,16)})+",00,00,00," + $proxystring + (%{[System.Convert]::ToString($bypassList.length,16)}) + ",00,00,00," + $bypassString + "00,00,00,00,00,00,00,00,00,00,00,00,00,00,00,00,00,00,00,00,00,00,00,00,00,00,00,00,00,00,00,00,00,00,00,00"
$regstringAsArray = ("0x"+$regString.replace(",",",0x")).Split(",")

$reg = "HKLM:\SOFTWARE\Policies\Microsoft\Windows\CurrentVersion\Internet Settings"
Set-ItemProperty -Path $reg -Name ProxySettingsPerUser -Value 0

$regs = "HKLM:\Software\Microsoft\Windows\CurrentVersion\Internet Settings","HKLM:\Software\WOW6432Node\Microsoft\Windows\CurrentVersion\Internet Settings"
foreach ($reg in $regs){
Set-ItemProperty -Path $reg -Name ProxyServer -Value $proxy
Set-ItemProperty -Path $reg -Name ProxyEnable -Value 1
Set-ItemProperty -Path $reg -Name ProxyOverride -Value $bypassList
}

$regs = "HKLM:\Software\Microsoft\Windows\CurrentVersion\Internet Settings\Connections","HKLM:\Software\WOW6432Node\Microsoft\Windows\CurrentVersion\Internet Settings\Connections"
foreach ($reg in $regs){
Set-ItemProperty -Path $reg -Name DefaultConnectionSettings -Type Binary -Value $regstringAsArray
Set-ItemProperty -Path $reg -Name SavedLegacySettings -Type Binary -Value $regstringAsArray
}

用户级别的设置

1
2
3
4
5
6
7
8
9
10
11
12
13
14
15
16
17
18
19
20
21
22
23
24
25
26
27
28
29
30
31
32
33
$proxy="http=<server>:<port>;https=<server>:<port>;ftp=<server>:<port>"
$bypassList="<local>;*.xxxx.com;xxxx.com;192.168.56.*;10.0.0.*"

$proxyString = ""
for ($i = 0;$i -lt (([System.Text.Encoding]::Unicode.GetBytes($proxy)).length); $i++) {
if ($i % 2 -eq 0) {
$byte = (([System.Text.Encoding]::Unicode.GetBytes($proxy))[$i])
$convertedByte=%{[System.Convert]::ToString($byte,16)}
$proxyString = $proxystring + $convertedByte + ","
}
}
$bypassString = ""
for ($i = 0;$i -lt (([System.Text.Encoding]::Unicode.GetBytes($bypassList)).length); $i++) {
if ($i % 2 -eq 0) {
$byte = (([System.Text.Encoding]::Unicode.GetBytes($bypassList))[$i])
$convertedByte=%{[System.Convert]::ToString($byte,16)}
$bypassString = $bypassString + $convertedByte + ","
}
}
$regString="46,00,00,00,00,00,00,00,0b,00,00,00,"+(%{[System.Convert]::ToString($proxy.length,16)})+",00,00,00," + $proxystring + (%{[System.Convert]::ToString($bypassList.length,16)}) + ",00,00,00," + $bypassString + "00,00,00,00,00,00,00,00,00,00,00,00,00,00,00,00,00,00,00,00,00,00,00,00,00,00,00,00,00,00,00,00,00,00,00,00"
$regstringAsArray = ("0x"+$regString.replace(",",",0x")).Split(",")

$reg = "HKLM:\SOFTWARE\Policies\Microsoft\Windows\CurrentVersion\Internet Settings"
Set-ItemProperty -Path $reg -Name ProxySettingsPerUser -Value 1

$reg = "HKLM:\Software\Microsoft\Windows\CurrentVersion\Internet Settings"
Set-ItemProperty -Path $reg -Name ProxyServer -Value $proxy
Set-ItemProperty -Path $reg -Name ProxyEnable -Value 1
Set-ItemProperty -Path $reg -Name ProxyOverride -Value $bypassList

$reg = "HKLM:\Software\Microsoft\Windows\CurrentVersion\Internet Settings\Connections"
Set-ItemProperty -Path $reg -Name DefaultConnectionSettings -Type Binary -Value $regstringAsArray
Set-ItemProperty -Path $reg -Name SavedLegacySettings -Type Binary -Value $regstringAsArray

Windows代理的忽略列表支持通配符*

设置WinHTTP类型的网络代理

1
netsh winhttp set proxy proxy-server="http=<server>:<port>;https=<server>:<port>;ftp=<server>:<port>" bypass-list="<local>;*.xxxx.com;xxxx.com;192.168.56.*;10.0.0.*"

如果WinINET设置的是手动网络代理,也可以导入WinINET的网络代理:

1
netsh winhttp import proxy ie

设置Linux风格的网络代理

1
2
3
4
5
6
7
8
9
10
11
12
$httpProxy = "http://<server>:<port>"
$httpsProxy = "http://<server>:<port>"
$noProxy = "localhost,127.0.0.1,.xxxx.com,xxxx.com,192.168.0.5"

$reg = "HKLM:\SYSTEM\ControlSet001\Control\Session Manager\Environment"
Set-ItemProperty -Path $reg -Name https_proxy -Value $httpProxy
Set-ItemProperty -Path $reg -Name http_proxy -Value $httpsProxy
Set-ItemProperty -Path $reg -Name no_proxy -Value $noProxy

Set-ItemProperty -Path $reg -Name HTTPS_PROXY -Value $httpProxy
Set-ItemProperty -Path $reg -Name HTTP_PROXY -Value $httpsProxy
Set-ItemProperty -Path $reg -Name NO_PROXY -Value $noProxy

Linux代理的忽略列表不支持通配符,比如*,但可以只增加域名后缀来匹配一系列域名
大小写的环境变量都设置了一遍,因为在实际工作中发现存在着一些应用或命令只识别大写或小写

Ansible脚本设置网络代理

以上设置网络代理的方式其实就是我们所说的ad-hoc脚本的方式,但是ad-hoc脚本在不同的Windows系统中移植性比较差,往往需要一些改动才能运行。使用配置管理工具比如Ansible来设置网络代理往往会带来两个好处:

  • 可移植性
  • 更少的代码

这也是我们所说的“现成的工具优先于专门脚本(tool over ad-hoc)”这一最佳实践。

以下是Ansible脚本样本:

1
2
3
4
5
6
7
8
9
10
11
12
13
14
15
16
17
18
19
20
21
22
23
24
25
26
27
28
29
30
31
32
33
34
35
36
37
38
39
40
41
42
43
44
45
46
47
48
49
50
51
52
53
54
55
56
57
58
59
60
---
- name: Configure IE proxy settings to apply to all users
win_regedit:
path: HKLM:\SOFTWARE\Policies\Microsoft\Windows\CurrentVersion\Internet Settings
name: ProxySettingsPerUser
data: 0
type: dword
state: present

- name: Configure IE to use a specific proxy per protocol using a string
win_inet_proxy:
proxy: http={{win_init_http_proxy}};https={{win_init_https_proxy}};ftp={{win_init_ftp_proxy}}
bypass: "{{win_init_no_proxy}}"

# This should be done after setting the IE proxy with win_inet_proxy
- name: Import IE proxy configuration to WinHTTP
win_http_proxy:
source: ie

- name: Set Linux style http proxy
win_environment:
name: http_proxy
value: '{{linux_style_init_http_proxy}}'
level: machine
state: present

- name: Set Linux style https proxy
win_environment:
name: https_proxy
value: '{{linux_style_init_https_proxy}}'
level: machine
state: present

- name: Set Linux style no proxy
win_environment:
name: no_proxy
value: '{{linux_style_init_no_proxy}}'
level: machine
state: present

- name: Set Linux style HTTP proxy
win_environment:
name: HTTP_PROXY
value: '{{linux_style_init_http_proxy}}'
level: machine
state: present

- name: Set Linux style HTTPS proxy
win_environment:
name: HTTPS_PROXY
value: '{{linux_style_init_https_proxy}}'
level: machine
state: present

- name: Set Linux style NO proxy
win_environment:
name: NO_PROXY
value: '{{linux_style_init_no_proxy}}'
level: machine
state: present

变量:

1
2
3
4
5
6
7
8
9
10
11
12
13
14
---
win_init_http_proxy: "<server>:<port>"
win_init_https_proxy: "<server>:<port>"
win_init_ftp_proxy: "<server>:<port>"
win_init_no_proxy:
- <local>
- "*.xxxx.com"
- "192.168.56.*"
- "10.0.0.*"

linux_style_init_http_proxy: http://<server>:<port>
linux_style_init_https_proxy: http://<server>:<port>
linux_style_init_ftp_proxy: http://<server>:<port>
linux_style_init_no_proxy: "localhost,127.0.0.1,.xxxx.com,xxxx.com,192.168.0.5"

命令方式设置Windows Server网络代理
https://www.mikesay.com/2020/02/03/windows-core-proxy/
作者
Mike
发布于
2020年2月3日
更新于
2024年4月19日
许可协议